/*
 * goes in theme functions.php or a custom plugin
 *
 * Subject filters:
 *   woocommerce_email_subject_new_order
 *   woocommerce_email_subject_customer_processing_order
 *   woocommerce_email_subject_customer_completed_order
 *   woocommerce_email_subject_customer_invoice
 *   woocommerce_email_subject_customer_note
 *   woocommerce_email_subject_low_stock
 *   woocommerce_email_subject_no_stock
 *   woocommerce_email_subject_backorder
 *   woocommerce_email_subject_customer_new_account
 *   woocommerce_email_subject_customer_invoice_paid
 **/
add_filter('woocommerce_email_subject_new_order', 'change_admin_email_subject', 1, 2);

function change_admin_email_subject( $subject, $order ) {
	global $woocommerce;

	$blogname = wp_specialchars_decode(get_option('blogname'), ENT_QUOTES);

	$subject = sprintf( '[%s] New Customer Order (# %s) from Name %s %s', $blogname, $order->id, $order->billing_first_name, $order->billing_last_name );

	return $subject;
}Category: WooCommerce
-
Change WooCommerce order emails subject
-
Hide WooCommerce payment or shipping methods conditionally and programatically
Payment gateways: woocommerce_available_payment_gateways filter hook
Shipping gateways: woocommerce_package_rates filter hook
-
WooCommerce admin settings options
Extending the WooCommerce Documentation page: https://woocommerce.com/document/settings-api/
'option_name' => array(
	'type' => 'title|sectionend|text|password|datetime|datetime-local|date|month|time|week|number|emailk|url|tel|color|textarea|radio|checkbox|select|multiselect|image_width|single_select_page|single_select_page_with_search|single_select_country|multi_select_countries|relative_date_selector', //Required
	'id'	 => 'Unique field ID',
	'title' => 'Title for your option shown on the settings page',
	'class' => 'Space separated classes for the input',
	'css' => 'Space and ; separated CSS rules added line to the input',
	'default' => 'Default value for the option',
	'desc' => 'Description for your option shown on the settings page',1
	'desc_tip' => 'Description for your option shown on the settings page',
	'placeholder' => 'Placeholder for the text field types',
	'suffix' => 'Content to place after text field field types',
	'value' => 'Do not set it as Woo will set it for you',
	'custom_attributes' => 'Array of type key => value that will be appended in the field construction sequence', //Eg. array( 'max' => '100', 'maxlength' => 3 )
	'label' => 'Label', // checkbox only
     	'options' => array(
          'key' => 'value'
     	) // array of options for select/multiselects only
);
to create your own type of field, there is an available action that takes in 1 parameter – $value
woocommerce_admin_field_{$type}eg. usage:
add_action( 'woocommerce_admin_field_my_custom_type', 'my_custom_field_type', 10, 1 ); function my_custom_field_type( $value ) { echo '<field value="' . $value . '">Label</field>'; } -
Remove WordPress users via WP CLI
Remove users with customer role:
# Delete user 123 and reassign posts to user 567
$ wp user delete 123 --reassign=567 --yes
Success: Removed user 123 from http://example.com

# Delete all contributors and reassign their posts to user 2
$ wp user delete $(wp user list --role=customer --field=ID) --reassign=2 --yes
Success: Removed user 813 from http://example.com
Success: Removed user 578 from http://example.com

# Delete all contributors in batches of 100 (avoid error: argument list too long: wp)
$ wp user delete $(wp user list --role=customer --field=ID | head -n 100) --reassign=567 --yes
Source: https://developer.wordpress.org/cli/commands/user/delete/
-
WooCommerce add custom product type
Great guide here: https://www.ibenic.com/custom-woocommerce-product-type/
Following this tutorial will get you to a point where you will have a working custom product type, but it will be missing the Inventory tab in the back-end
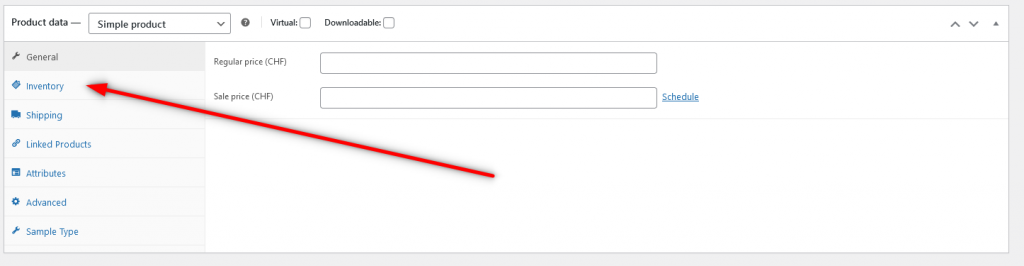
To fix that, you will need to add the following JS to your admin_footer method you’ve already created following the tutorial:
jQuery('.inventory_options').addClass('show_if_advanced').show();
<?php if ( $is_advanced ) { ?>
jQuery('.inventory_options').show();
<?php } ?>
See more here: https://stackoverflow.com/questions/43109755/how-to-enable-price-and-inventory-for-custom-product-type-in-woocommerce
Also, after following the tutorial, chances are that your product will not save correctly. It will save as Simple product instead of your custom product type.
To fix that, you need to add a constructor to your custom product class, the one that extends WP_Product.
The constructor should contain the following:
public function __construct( $product ) { $this->product_type = 'advanced'; parent::__construct( $product ); } -
Configure payment gateway to support WooCommerce Subscriptions
Guide here: https://woocommerce.com/document/subscriptions/develop/payment-gateway-integration/
WooCommerce Subscriptions API overview: https://woocommerce.com/document/subscriptions/develop/
Overview here: https://woocommerce.com/document/subscriptions/payment-gateways/